Android Connected To WiFi But No Internet: This post will explain how to resolve Android is connected to WiFi but has no Internet. Unfortunately, there are times when your Android begins to act strangely while connected to the Internet. The dreaded “Connected but no Internet Access” notice is simply cryptic. Many factors may cause this issue. Here are some solutions you might try to fix the problem.
Fix Android WiFi Connected But No Internet
There are many viable solutions since there is no specific cause for this connection issue. However, we have provided a few remedies that you might try to regain Internet access. So, without ado lets move to fix Android connected to WiFi but no Internet issue.
1. Check Whether You Are Connected to the Internet
I know it sounds ridiculous. But believe me when I say I’ve been there and done it. Most likely, you are experiencing this issue because your router is not connected to the internet. So, connect to that router wirelessly with another device and check if you can go online.
Suppose the other devices on your WiFi network aren’t able to connect to the Internet. In that case, your ISP may be down (you can confirm this by calling your ISP), someone has accidentally cut the broadband cable coming to your house (you can verify this by asking your neighbors who share the same connection), or you’ve used up your monthly data plan.
Most ISPs provide unlimited data plans; however, a few internet service providers block data consumption beyond a particular level. To fix this, recharge your internet package. After that, reboot your device and try to connect to the WiFi network again.
Another possibility is that certain websites might not operate on a specific WiFi network. For example, all torrent websites are blocked on our business WiFi. So, if that’s the case, try visiting a variety of websites.
If you can access the Internet on all other devices save your Android smartphone, something is wrong with your Android. Moving ahead, we will try to fix your Android smartphone.
2. Check that mobile data is turned off
When you switch on mobile data and subsequently connect to a WiFi network, you may not access the internet at times. To fix the issue, try off mobile data.
You could be thinking that Android is too intelligent for this. However, when you connect to a WiFi network, Android may sometimes favor WiFi over mobile data. Some networks, however, require users to check-in before they can access the internet. Even after checking in, Android may not see the connection as active and continue to consume mobile data. In such cases, Android may not connect to the internet on both networks.
Try off mobile data and then connect to a WiFi network.
3. Examine for Captive Portals
If you’re connected to a home WiFi network, you may skip this step. However, specific WiFi networks (particularly in businesses, airports, and coffee shops) use a particular kind of Wi-Fi network known as “Captive Portals.”
When you connect to this sort of WiFi network, even after entering the correct WiFi password, you must complete one further step before you may access the internet. This additional step might be anything from signing in with your email or phone number to watching advertisements or agreeing to the network’s terms of service.
If you are connected to Captive Portal WiFi, you will receive a notification on your device requesting you to sign in. If you do not get the sign-in signal the first time you connect to the network, you may disconnect and reconnect. It ought to work. Tap the notice and then follow the on-screen instructions. Complete the needed job or contact the network administrator for login information. It may helps to to fix Android connected to WiFi but no Internet issue.
For example, our business WiFi network needs users to check-in using an official username and password to access the internet. Please refer to the screenshot that may be seen below. After 24 hours have passed since your last successful login, you will need to begin the procedure from the beginning again.
4. Verify the Time and Date Settings
Another item that seems trivial but incorrectly adjusted time and date settings may create many issues. Android devices are set up to collect date and time information from your network provider automatically. However, if you modify those settings manually, you may need to reset them. Because when the date and time settings are set to manual, a restart may result in the clock not being updated.
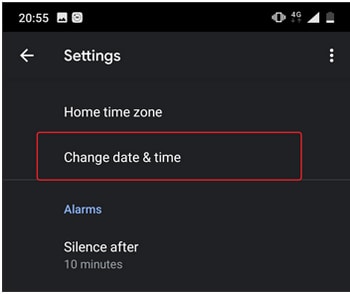
Open the “Clock” app to establish an automatic date and time. Then, to enter the “Settings” menu, press the three vertical dots located in the upper-right corner of the screen.
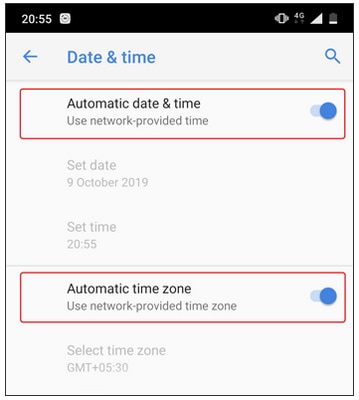
Select “Change date and time” from the Settings menu. Next, toggle the buttons adjacent to “Automatic date and time” and “Automatic time zone” on the following screen.
If you do not want automatic time settings, you may manually adjust the time by choosing “Set date,” “Set time,” and “Select time zone.”
After that, reboot your device and try to connect to the WiFi network again.
5. Disconnect and reconnect to the WiFi network
Sometimes forgetting about the troublesome network and rejoining might fix the issue. For example, when you reconnect to the WiFi network, you may be assigned a new local IP address, which may resolve the issue. To do so, go to your Android Settings and navigate “WiFi.” Then, press on the WiFi network and choose “Forget.”
Tap on the WiFi network once again, input the password, and press the “Connect” button. That’s all. If the issue is still not resolved, go on to the following remedy to fix Android connected to WiFi but no Internet.
6. Check if your router is blocking network traffic.
It is conceivable that the WiFi router to which you are attempting to connect is blocking your Android device from connecting to the internet. Someone, for example, may have inadvertently abused your router’s MAC address filter and blocked your Android. If this is the problem, you will not know it until you visit the WiFi router’s admin page and unblock yourself.
The router admin page varies depending on the brand and model. So, read your router’s handbook, navigate to the proper settings page, and check whether the router is blocking your device. Some routers have the portal’s IP address, username, and password printed on the back of the device. We have a comprehensive tutorial below that will assist you in logging into your router.
I have a D-Link router in my case. I may check whether or not my device is blocked by going to the “Advanced” page and choosing the “Traffic Control” option. Look for settings like the MAC Address Filtering menu on other routers. To restore internet connectivity on your Android phone, choose Remove or Allow from the menu if it appears on the list of devices that have been banned.
7. Modify your DNS settings
Check to see if you can access websites using their IP address instead. If you can, there is probably a problem with your ISP’s domain name server. Simply changing to Google DNS (8.8.8.8; 8.8.4.4) will fix the issue.
We have thorough instructions for changing the DNS on all of your standard devices, but for Android, go to your WiFi settings, long-press the WiFi network whose DNS you want to change, and then choose “Modify network.” Next, select Static from the IP settings menu and input the static IP, DNS1, and DNS2 IP addresses. That’s all there is to it.
You may also use a third-party Wi-Fi program like WiFi Settings. However, if you are using Android 5.0 or above, your “save changes” button may not function properly. It is because, before Android 7, third-party applications were not permitted to modify network settings.
8. Change the Router’s Wireless Mode
It is rare if you have an outdated Wi-Fi card or device. However, if you have Internet access on other devices, there is likely a communication barrier between your Android and router.
On a router, there are numerous Wireless modes. For example, you may have seen 802.11 b, 802.11 b/g, 802.11 b/g/n, etc. In addition, wireless standards b, g, n, and ac are all distinct. B is the earliest WiFi standard, covering less area and providing less speed, while ac is the most recent, providing more coverage and faster network speeds.
Consider them the USB 1.0, 2.0, and 3.0 standards, with the latest being the fastest and most backward compatible. In addition, the wireless mode is set to 802.11 b/g/n/, which works well for most people. However, specific older devices (particularly older smartphones) are incompatible with this mode and consequently exhibit network difficulties.
One solution is to log in to your router dashboard from your computer and check for the Wireless Mode option. Typically, you configure the WiFi SSID and password under Wireless settings. Next, under Wireless mode, you’ll notice a drop-down choice; pick 802.11 b and save adjustments. Finally, restart the WiFi on the devices experiencing WiFi difficulties to see if this resolves the problem. If this does not work, try to 802.11 g. If you are still unsuccessful, go to the next solution to fix Android connected to WiFi but no Internet.
9. Restart or reset the WiFi router
Try rebooting the router if you are sure that the Android device is not being blocked at the router level and that there is no issue with the wifi mode. Whether you reboot via the admin panel or the physical buttons makes no difference. So, complete your option and reboot the router; the process should take no more than 30 seconds.
If rebooting does not work, the router must be reset. Again, depending on the manufacturer, the reset option may be found on the Maintenance or Advanced settings pages. You may also do a hard reset by pushing the hardware reset button on the back of the router.
Remember that resetting the router will erase all its settings and ISP IP address sets. So, make a note of the credentials and backup the relevant information ahead of time to set up the router after the reset is complete.
10. Reset Android Network Settings
If none of the methods given earlier were successful, it might be necessary to reset the network settings on your Android device. Open the Settings app and choose “Reset settings” from the menu to fix Android connected to WiFi but no Internet.
Now, choose “Reset Wi-Fi, mobile, and Bluetooth.”
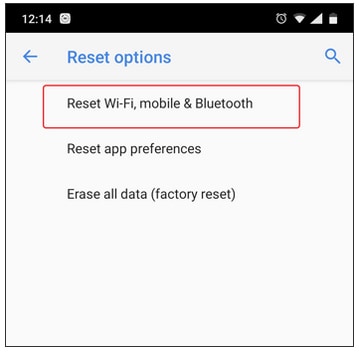
Tap the “Reset Settings” button at the bottom of the following page. After resetting, reconnect to the WiFi network to determine whether the problems have been resolved.
11. Factory Reset
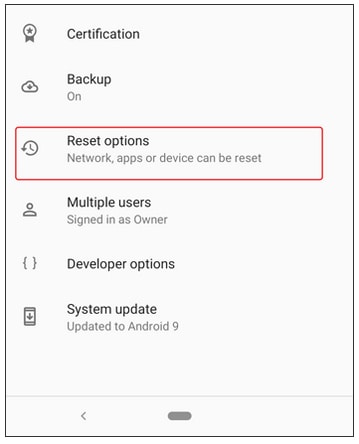
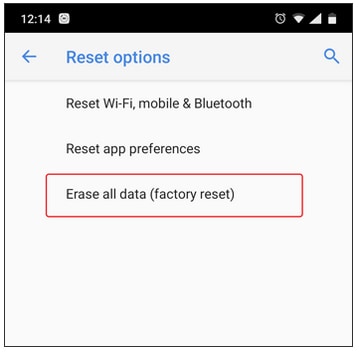
If none of the other troubleshooting steps work, the last resort is to do a factory reset on the Android device in question. First, launch the Settings app and go to the “Reset options” menu to perform a factory reset.
Finally, choose “Factory data reset” from the menu to fix Android connected to WiFi but no Internet.
To reset the Android smartphone, go to the confirmation page and choose the “Reset Phone” button. The process of resetting may take some time to finish. Before doing a factory reset, ensure that your device is ultimately charged or has a battery level of at least 70%. That’s all of the troubleshooting steps we can think of to fix Android connected to WiFi but no Internet issue. Please let us know if you find any additional workarounds in the comments section below. Also read article on how to Turn On Bluetooth in Windows 11?