Does Initializing a Disk Erase Data? How to Initialize a Disk? [Fixed]
When it comes to managing your storage drives, a crucial action that often arises is disk initialization. This
action not only optimizes your storage space but also resolves disk-related issues. However, computer novices
frequently raise questions such as What does initializing a disk mean? or Does initializing a disk erase data? In this concise guide, we will delve into the specifics of disk initialization, addressing its meaning and the potential impact on your data. Additionally, we’ll explore how to initialize a disk without losing data.
Part 1: What Does Initialize Disk Mean?
Initialize disk refers to the process of preparing a storage device, such as a hard drive or a solid state drive (SSD), for use. During disk initialization, essential data structures, like the partition table and file system, are created on the disk. This enables the operating system to recognize and manage the storage space effectively. However, during this process, you might face the risk of data loss, so it’s important to understand how to initialize a disk without losing data.
Part 2: Does Initializing a Disk Erase Data?
Questions like Does initializing a disk erase data or If I initialize a disk, will it be erased? are commonly asked when discussing disk initialization. Yes, initializing a disk typically erases the data stored on it.
During the disk initialization process, you can choose Full Initialization or Quick Initialization according to your needs. Quick Initialization won’t delete user data or perform a thorough scan of the disk. In contrast, Full Initialization erases all existing data, partitions, and file systems, effectively restoring the disk to its factory state. If you haven’t backed up your files before this, you should consider how to recover data after initializing the disk.
Part 3: How to Initialize Disk Without Losing Data?
As mentioned above, initializing results in clearing up your hard drive from all the existing data files. If you want to retain your previous data even after initializing your disk, then you need to adopt certain methods to initialize the disk without losing data.
Preparation: Using Reliable Software to Save Your Data
Before initializing the disk, we strongly recommend utilizing a professional data recovery tool to extract data from the uninitialized disk. This not only helps prevent data loss caused by accidental selection of the wrong disk or partition but also enables you to proactively back up your valuable data.
Tenorshare 4DDiG Data Recovery is designed for recovering data from compromised or unrecognizable drives and devices. With this software, you can easily retrieve lost or deleted data from various sources like Windows, Mac, USB flash drives, SD cards, external hard drives, and more, all within three simple steps. Download it and then perform the following steps:
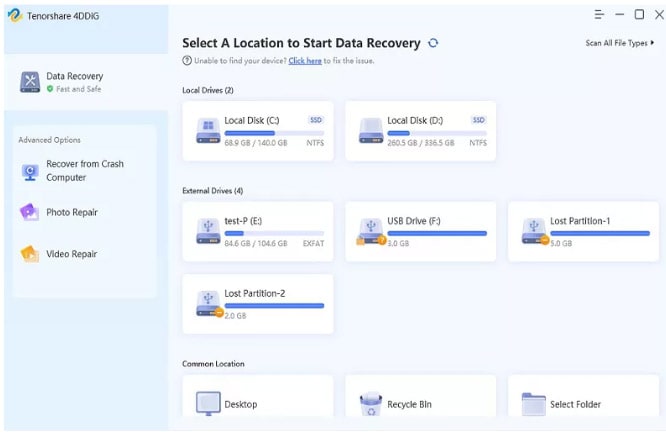
Step 1: The main interface of this tool will display all your devices and drives. The uninitialized partition will be shown as Lost Partition in the user interface. You can select it and then click the Scan button to continue.
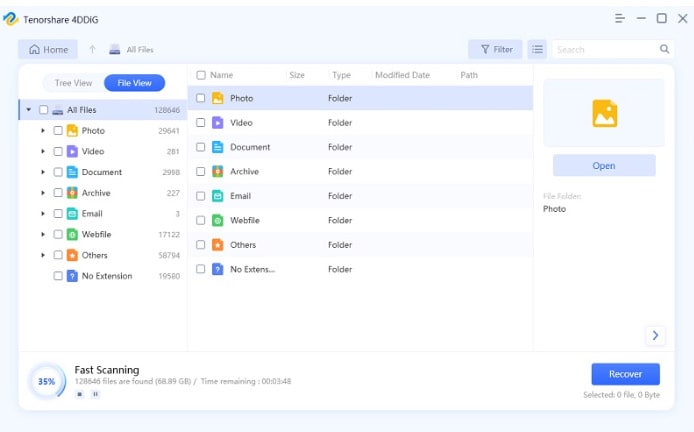
Step 2: This tool will start examining your selected disk or drive for any lost data. There is a progress bar on the screen that will tell you much data is checked and how much is remaining. Additionally, you can pause and stop this scanning process whenever you find the desired files that you are looking to recover.
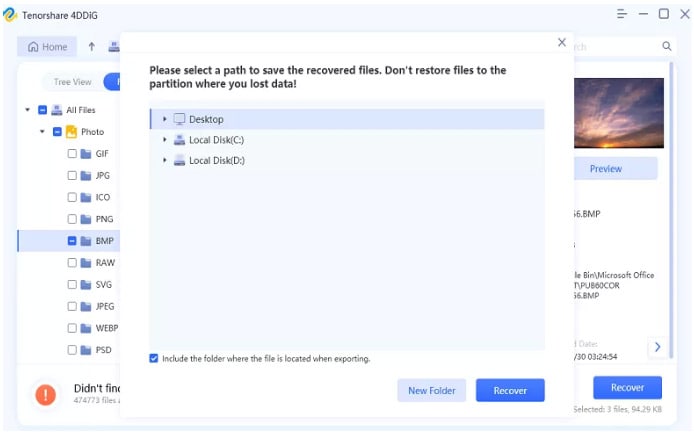
Step 3: You can select the desired files from the scan results, preview them, and click Recover in order to retrieve them from your hard drive. After selecting Recover, a drop-down menu will appear, asking about the location where you want to retrieve the files. So, select the desired yet safe location and press the OK button.
Now after performing all these steps, you can initialize your disk without losing data.
Method: Initialize a Disk via Disk Manager
Disk Manager is a crucial tool for Windows users to manage hard drives and storage devices, assisting them in various disk management tasks, including initializing hard disks. Here is how you use it to initialize your disk without losing data:
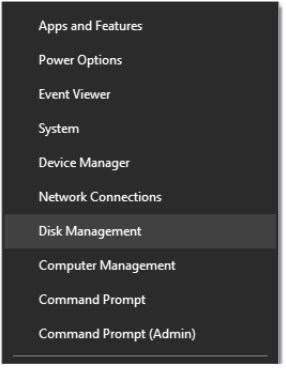
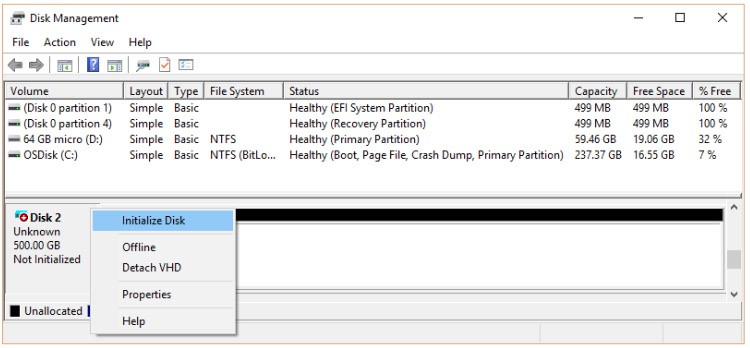
Step 1: Make sure the disk is connected to your computer properly. Then, press Win + X and select Disk Management from the menu that appears.
Step 2: Locate the disk that you want to initialize. Right-click on it and press the button “ Initialize Disc.”
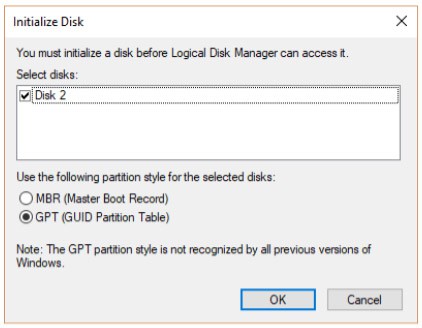
Step 3: In the Initialize Disc window, choose MBR or GPT as the disk partition format. Tap OK at that point to proceed.
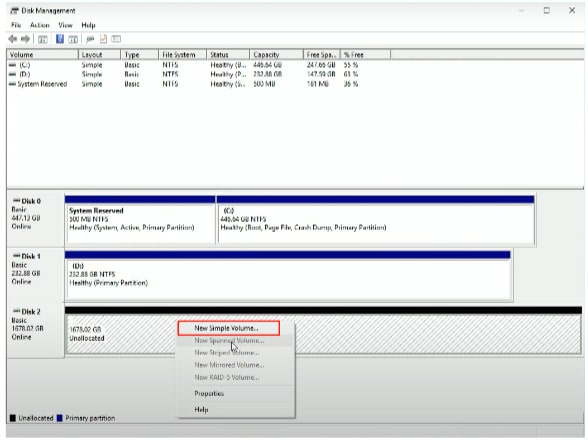
Step 4: Once the disk is initialized, you need to create partitions on it. Select New Simple Volume" after right- clicking the unallocated space.
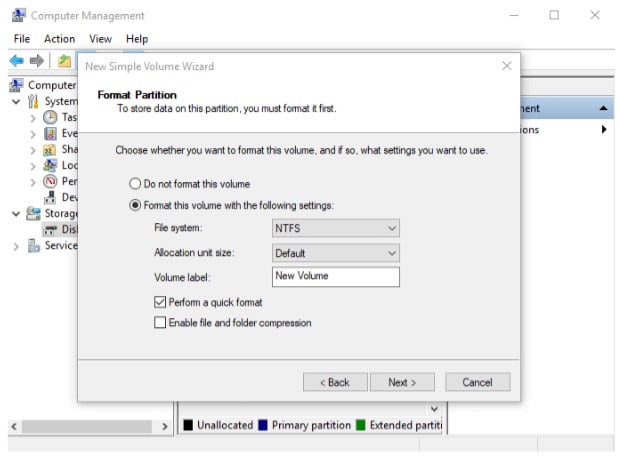
Step 5: Follow the on-screen instructions to set the partition size, drive letter, formatting options (NTFS is the
recommended file system), and volume label.
Remember that initializing a disk will erase any existing data on it.
Part 4: Why You Need to Initialize a Disk?
Does initializing a disk erase data? Yes, but initializing a disk is necessary, especially when setting up a new hard drive. Here are some common scenarios why you might need to initialize a disk:
New Hard drive
You need to initialize a disk if it’s brand new. So, only by initializing it, you can create partitions on it to store data on it afterward.
Hard Drive Errors
Your hard drive becomes “uninitialized” due to some issues of hard drive errors. In that scenario, you also need to initialize your disk to use it to resolve the error and to make the hard drive functional again.
Altering Partition Styles
When you want to convert the partition style for your hard drive, like from Master Boot Record (MBR) to GUID Partition Table (GPT) or vice versa, then you need to initialize your disk.
Part 5: Why Does the Disk 1 Unknown Not Initialized Error Occur?
The above-detailed methods assist an individual in properly initializing the disk without requiring expert help. However, there are instances where you might encounter the error message Disk 1 Unknown Not Initialized preventing disk initialization.
This error typically occurs when there are issues with the disk partition table or if the disk itself is not being recognized properly by the operating system. To resolve the Disk 1 Unknown Not Initialized issue, you can start by checking cables and connections or trying the disk on another computer. If you still can’t initialize the disk, you should take professional help to resolve this issue.
Bottom Line
In multiple cases, initializing a hard drive is a must. So, if I initialize a disk, will it be erased? Yes, it will erase your data if you don’t follow specific steps to make your data secure. We have compiled all the steps to initialize disk without losing data that you must consider. If you want to have the safest and most effective way that gives you the desired results within a short time, then go for 4DDiG data recovery software. It retrieves all your important files and documents before running the initializing process. So, even after disk initialization, you can access them without any problem.
FAQs about Initialize Disk without Losing Data
Q: How to fix the “You Must Initialize a Disk error”?
The “You Must Initialize a Disk” error typically occurs when you try to access a new or unrecognized disk. To fix this error, follow these steps:
Step 1. Open Disk Management and identify the uninitialized disk.
Step 2. Right-click on it and choose "Initialize Disk."
Step 3. Choose partition style (MBR or GPT).
Step 4. Create partitions and format them.
Step 5. Complete the wizard and access the disk.
Q: What happens when you initialize a disk?
When you initialize a disk, several important changes occur:
1. A partition table is created.
2. You can create partitions for data organization.
3. You can choose between MBR or GPT partition style.
4. Partitions are formatted with a file system.
5. Drive letters are assigned.
6. Existing data is erased.
7. The disk becomes ready for use.
Q: Should I initialize disk in MBR or GPT?
Choose GPT for modern systems like Windows 11 and larger drives exceeding 2.2TB. Alternatively, opt for MBR for older systems or compatibility requirements.