Although DirectX errors on Windows 11 are rare, it does not means that you can not face these errors.
DirectX errors will impact your PC’s audio and visual hardware. The primary function of DirectX is to improve the performance of your PC’s audio and visual hardware. You will receive improved visual quality, gaming experience, and audio quality with DirectX installed on your Windows 11 PC. DirectX is pre-installed on your PC and is automatically updated to provide uninterrupted performance and reduce the probability of errors.
How to Troubleshoot DirectX Errors on Windows 11
If you are experiencing DirectX errors, this article will provide some possible solutions to assist you in fixing DirectX errors on Windows 11.
[lwptoc]1. Check the DirectX Version
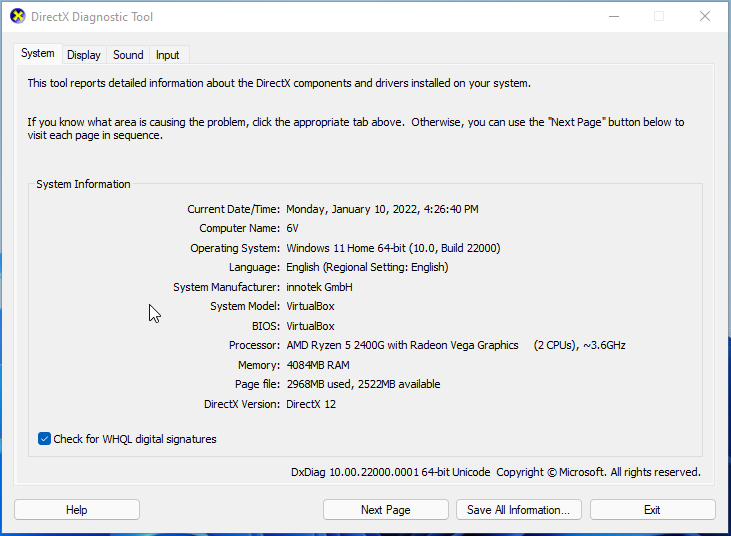
You may check by checking the DirectX version. If you do not already have DirectX 12, Microsoft recommends that you download the most recent version to avoid DirectX errors on Windows 11. Here’s how to check it.
- In the right panel, type dxdiag into the Search box and click Open.
- Check the DirectX version under the System tab.
2. Update DirectX
It is most likely caused by out-of-date DirectX software. Although DirectX is routinely updated, if it is not, you may encounter DirectX errors on Windows. The steps to update DirectX to the latest version are listed below. It is advised that you download the most recent DirectX version. Click on this link to access the DirectX download page in your browser.
- Download the DirectX End-User Runtime Web for your PC.
- Run the setup file you downloaded to update DirectX to the latest versions.
- After that, restart your computer, and you should no longer face DirectX errors on Windows 11.
3. Update Windows 11
Another major cause of DirectX Errors on Windows 11 is an incomplete or pending Windows updates. Windows updates can fix you in resolving a wide range of system difficulties and glitches. When you encounter the DirectX 12 not working on Windows 11, you should try updating Windows to the most recent version and then see whether the problem persists. Follow the steps below to update Windows 11.
- On your Windows 11 PC, launch the Settings app. To do so, press the Windows + I key combination.
- Choose Windows Update from the options on the left sidebar of the Settings app.
- On the right, click the Check for Updates option.
- Download and install all updates found on your PC, then restart it.
4. Update Your PC’s Drivers
After updating the driver on your computer, you should check to see whether the issue still occurs. You must check that you are running the latest graphics driver version. If you have incompatible, corrupt, missing, or outdated drivers, you will encounter the DirectX errors on Windows 11 issue. To resolve the issue, you must update the driver. You may update the drivers from the Windows Update section’s Optional Update section. To do so, follow the steps below:
- To open the Settings app, press the Windows + I key combination.
- Navigate to the Windows Update area in the Settings’ left sidebar.
- To access the Advanced Options and Optional Updates, click on the corresponding links on the right.
Then, click Driver Updates and download and install all available updates.
Alternatively, Method 2
- In the Run box, open devmgmt.msc. Then hit Enter to access Device Manager.
- To expand Display adapters, double-click it. Then, on the right, click your graphics card driver and select Update Driver.
- In the pop-up box, you will be asked how you wish to search for drivers. To complete the process, select Search automatically for updated driver software and then follow the steps.
- To update the drivers on your PC, you can use third-party driver updater software such as Driver Booster or DriverPack Solution.
5. Perform a Clean Boot
A Clean Boot can help you start Windows with a limited collection of drivers and launch apps, avoiding software incompatibilities. It may helps in fixing DirectX errors on Windows 11. To perform a clean boot, you must:
- In the Run box, type msconfig and hit Enter (using the Windows +R keys to open the Run box).
- Next, navigate to the Services tab. Check the option that says Hide All Microsoft Services.
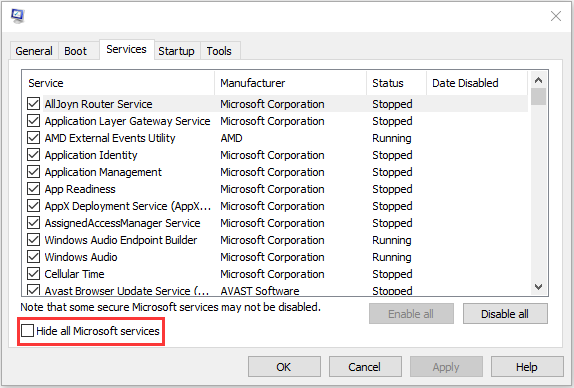
- To save the adjustment, click the Disable all option and then Apply.
- Now, Click the Startup tab and select Open Task Manager from the menu.
- Select the first enabled program in the Task Manager tab and click Disable. You must disable each enabled program one by one. Close Task Manager and click OK after deactivating all programs.
- Restart your computer to face the issue.
6. SFC Scan should be run
You can try performing an SFC scan to see if it can help you to fix DirectX errors on Windows 11 and any other issues on your PC caused by damaged system files. Follow the steps below to run an SFC scan.
- Go to the Start Menu and search for CMD. Right-click on it in the search results and select Run as Administrator.
- Type sfc /scannow in the Command Prompt and press Enter to run the command.
- The SFC scan will now run. Wait for the process to finish before restarting your computer.
7. Perform a System Restore
If none of these fixes help to resolve DirectX errors on Windows 11 issue, the final option is to perform a system restore. To continue with this step, you will need to have a restore point created when your computer was working normally, and you were not having any issues. To do so, follow the steps below:
- To begin, open the Run Dialog Box on your computer by pressing the Windows + R key combination.
- To open it, type rstrui in the Run Dialog Box and press Enter. It will open the System Restore wizard.
- To continue, click a different restore point and then click Next.
- Select your restoration point on the following window. After you’ve chosen a restore point, click Next.
- Wait for the process to finish before clicking Finish.
- After that, you should no longer face DirectX errors on Windows 11.
Last Words
The preceding article described several troubleshooting steps to fix DirectX errors on Windows 11. If you run into a problem with DirectX, follow the steps in this article, and you will be able to fix the problem without a hitch.