
This Guide will teach you how to Make a Backup of Files in Windows 10. A complete guide with step-wise instructions. A full system backup is the most excellent defense against hardware difficulties, software issues, and malware that may cause damage and corrupt essential files.
If you do not create backups regularly, you risk losing crucial documents, images, essential custom settings, or other items that you may have spent many hours creating or configuring due to human error or internet threats such as ransomware and malware.
On Windows 10, you may make a backup in a new way. You may also use Windows system restore to return to an initial stable state if anything goes wrong. Manually moving files from an internal hard drive to external storage, saving files on One Drive or another cloud service, and using a third-party backup program are all files. You may use the Windows default backup system capability if you don’t want to employ a third-party solution.
How to Make a Backup of Files in Windows 10
File History in Windows 10 is a simple data backup method for creating Backup settings and backing up your files. It creates snapshots of files and saves them to external storage, which may be connected through a micro or small USB or your home network. File history generates a library of previous versions of documents, which you may restore if necessary. If backing up on the system is cumbersome, you may use an external hard drive, backup media, or cloud storage. We also recommend that you archive your data and big vital files and store them securely.
File History in Windows 10 is an essential component of a file backup strategy, but it is just one component. Your files were stored in three locations:
1. The existing primary working copy on your internal hard disc.
2. A local backup that you may access immediately.
3. An offsite backup that keeps your files secure.
If anything happens to your device, such as a major accident, you may access your files using the remote backup. An online backup storage service is the simplest way to manage or retrieve the remote backup.
Using File History to Back Up Files
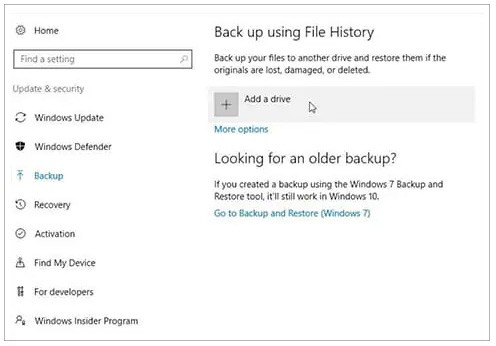
Step 1: To begin, click the Start button and choose Settings. A window appears; click the Update & security category from the settings window. Then click the Backup button. Backup using History appears on the right side of the window. Click the ‘Add a drive‘ link under the title.
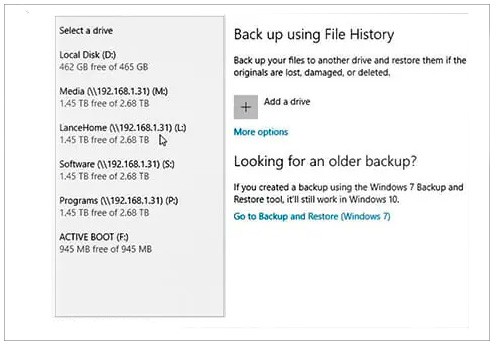
Step 2: make sure your usable external backup device is connected. A list of all such locations will be provided through a Windows display. Choose where you want to save your backups.
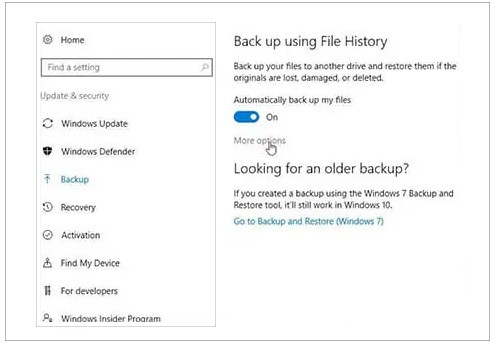
Step 3: Enable file history to backup any files. For more possibilities,’ click on the link.
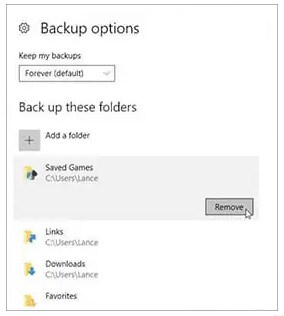
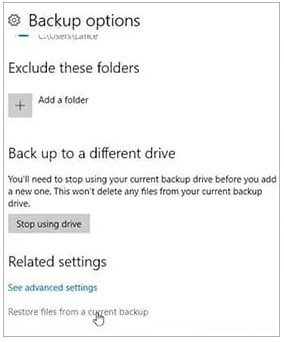
Step 4: A window with backup options will appear. Scroll to the bottom of the backup choices window. You will see a list of default folders already included in the backup. You may delete any folder; choose the folder you do not want to backup and click the remove button.
You may also add a folder, not in the backup list you want to add. To access this, scroll all the way back up to the top of the window. Click the Add a Folder button. File Explorer allows you to choose directories.
Step 5: At the very top of the window displaying the file history, click the drop-down menu and pick the ‘back up my files‘ option, then decide how often you want to back up your files, which ranges from every 10 minutes to daily. Click the ‘keep my backups‘ drop-down option underneath that. Choose how long you wish to keep your backup files, from ‘until space is required’ to ‘forever.’ After choosing your selections, click the back up now button. Windows will now begin backing up the files under your backup settings.
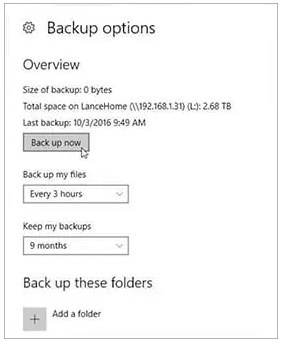
Step 6: When your backup is complete, Windows shows the size of the backup, total space on lance home, last backup information like the date and time of the previous backup.
Step 7: Sometimes, the critical file you need is missing or has been corrupted, making it impossible to access or view. Fortunately, it was included in your backup file history. Scroll to the bottom of the file history window to locate the restored files from a current backup’ link. Click this button.
Step 8 (Restore): Windows displays, page by page, all the folders that have been blocked by file history. You may need to return to the previous page or window to locate the file you seek. When you see a page that looks like it could contain the file you’re searching for, double-click on it. You may see the file by double-clicking on it if the file is visible. If you wish to restore the file, go to the bottom of the window and click the green button with the white arrow.
Suppose the file still exists at its original file location, widows request that it be replaced in the destination, skip this file, and compare the information for both files. If the original file is lost, Windows will restore it to its original place.
Windows 10 System Image Tool Backup
Another method for securely backing up your files is to create a system image. It’s a fancy saying ‘complete backup,’ since it’s a duplicate of everything on your computer, including settings, programs, personal files, and your Windows 10 installation. You may quickly restore your complete storage system from hardware or software faults using the same or a different disc.
Using this backup program, you may store a backup in a different place, such as a secondary hard drive or a network folder. You are advised to use additional removable storage, which you can quickly connect, detach, and store in a secure area.
Please follow the instructions below to back up files using the system image tool:
Step 1: To begin, click the Start button and choose Settings. A window appears; select the Update & security category from the settings window. Then click the Backup button. The title ‘Looking for an older backup?‘ appears on the right side of the window. Under this title is an option that says “go-to backup and restore (Windows 7).” Click on it.
Step 2: To create a system image, choose the option located on the left side of the window and click it.
Step 3: A new window will open. Select a hard drive option under ‘where do you want to save the backup?‘ Select the precise storage place where you want to store the entire backup of Windows 10 using the ‘on a hard drive’ drop-down option. Next, click the button.
Step 4: You may discover storage information under ‘confirm your backup settings.’ If everything is in order, click the Start backup button.
Step 5: Click the no button.
Please keep in mind that you will be allowed to create a system repair disc at the end of the procedure.
However, as most machines no longer feature an optical disc drive, you may disregard this option.
Step 6: Finally, click the close button.
Once you’ve finished the procedures, the tool system will create a backup of your storage, including practically everything on the primary hard disc and any system reserved partitions and extra drives you’ve chosen.
The system image backup utility employs shadow copy technology, enabling it to backup files while they are open. The system image backup program recommends frequent backups in case you need to restore files from software or hardware failure, malware, ransomware, or any undesired situation.
Backups are essential for protecting your installation and critical files. Windows gives you many options for backing up your files. To safeguard files against unintended device failure or other damage. If you wish to retain an up-to-date backup of your files, Windows 10 enables you to do so. It would help if you used the system image tool in conjunction with file history or disc settings. Also read article on how to Install Windows 11 22H2.