This article will explain how to resolve spell checker issues in Microsoft Word. The built-in spell checker in Microsoft Word guarantees that your documents are free of spelling and grammar problems. If this feature ever stops working, problems in your document will not be highlighted. As a result, you risk producing documents with grammar issues.
Several factors might cause Word’s spell checker to fail. For example, it is possible that you disabled the spell checker manually, typed the incorrect language into Word’s settings, or the document you are working on is an exception to the spell checker.
Once you’ve resolved those issues, your spell checker will resume highlighting all of your spelling and grammar errors.
Enable the Spell Check feature in Microsoft Word
In this post you will know how to to fix Word spell checker issue. When you discover that your spelling or grammar issues aren’t highlighted in your documents, you should check to see whether Word’s spell checker is turned on. You or someone else may have deactivated it, causing Word not to check your documents for issues.
1. Launch Microsoft Word on your PC.
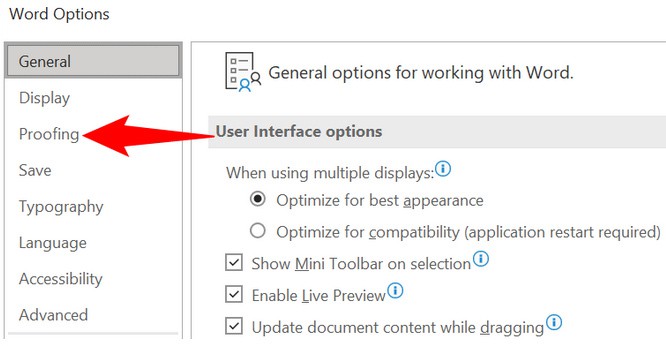
2. Select Options from the left-hand sidebar.
3. Select Proofing from the left sidebar in the Word Options box.
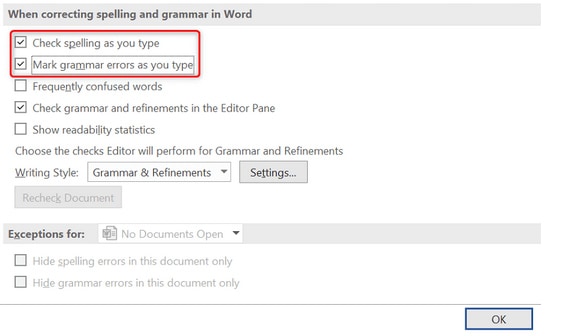
4. On the right pane, enable the Check spelling as you type and Mark grammar errors as you type choices.
5. At the bottom, click OK to preserve your changes.
Word will now highlight misspelled words and grammar mistakes in your documents.
Select the appropriate proofing language in Microsoft Word
If your document includes numerous languages, you should select the appropriate proofreading language in Word. If you haven’t set your second language in the proofreading options section, Word may not highlight problems in that language.
Fortunately, you may highlight issues by selecting the section of your Word document in a foreign language and selecting the appropriate language in proofreading.
1. Open your Word document.
2. Choose the document section that contains text in a foreign language.
3. Select the Review tab from the top ribbon. After that, go to Language > Language > Set Proofing Language.
4. Choose the language you want your text to be in using the dialogue box that opens.
5. Uncheck the boxes that say Do not check spelling or grammar and Detect language automatically.
6. At the bottom, click OK.
Review Word Proofing Exceptions
Word has the feature to deactivate the spelling and grammar checker in certain documents. First, you must confirm that your current document is not on the list of exceptions. If it is, you must remove the exception, so that Word checks for and highlights spelling and grammar errors in your current document.
1. Open your document in Word.
2. In Word, go to File > More > Options.
3. Select Proofing from the left-hand sidebar.
4. Scroll to the bottom of the right pane. Then, from the Exceptions for drop-down box, select your current document.
5. Uncheck the options Hide spelling errors in this document only and Hide grammar errors in this document only.
6. At the bottom, click OK to preserve your changes.
Launch Microsoft Word in Safe Mode to determine which Word Add-Ins could be the source of the issue
Word enables you to add third-party add-ins to the app. Occasionally, one or more of these add-ins creates issues. For example, your spell checker may not be working due to an installed add-in.
In this scenario, you may run Word in safe mode to verify whether your add-ins are the source of the culprit. Then, deactivate all add-ins and enable one at a time to determine which one is causing the problem.
1. Open Word in safe mode by searching for it in the Start menu, holding down the Ctrl key on your computer, then selecting it from the search results.
2. In the popup, choose Yes to open Word in safe mode to fix Word spell checker issue.

3. Open your document in Word and see if any spell or grammar issues are highlighted. Again, if the built-in spell checker is working, your add-ins are most likely to blame.
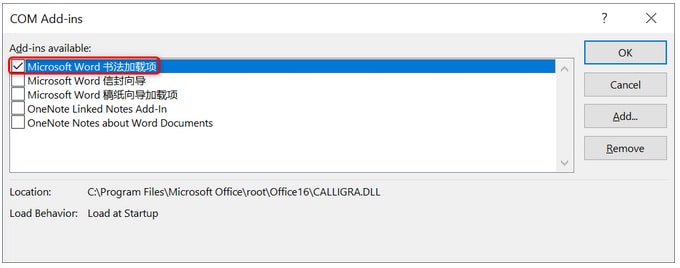
4. Go through your add-ins list by closing and reopening Word in normal mode, then selecting File > More > Options.
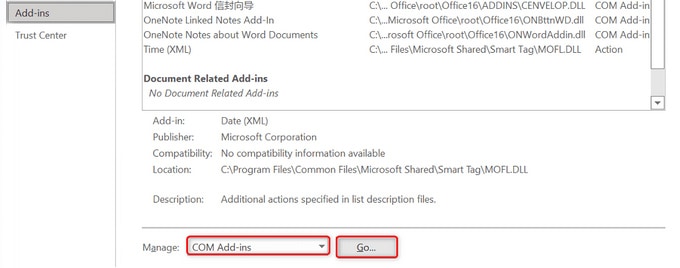
5. Select Add-ins from the left-hand sidebar.
6. Select COM Add-ins from the Manage drop-down box on the right. Then click Go.
7. Leave just one add-in activated while disabling all others to observe whether the problem persists. In this manner, you’ll know which add-in is causing Word’s spell checker from working.
Allow Word to create a new default document template
Word bases all subsequent documents on a default document template. If this template includes issues, your spell checker may not function properly. Renaming the existing template will compel Word to create a new template in this scenario to fix Word spell checker issue.
It causes Word to believe you’ve removed the template and the app to create a new one from scratch.
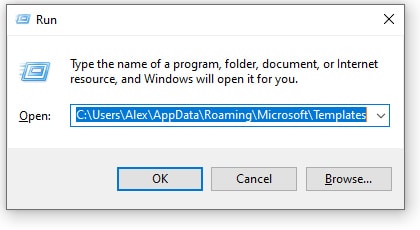
1. To bring up the Run dialogue box, simultaneously press the Windows and R buttons on your keyboard.
2. Type the following in the box and hit Enter. In the route below, replace the username with the username you use on your PC: C:\Users\username\AppData\Roaming\Microsoft\Templates
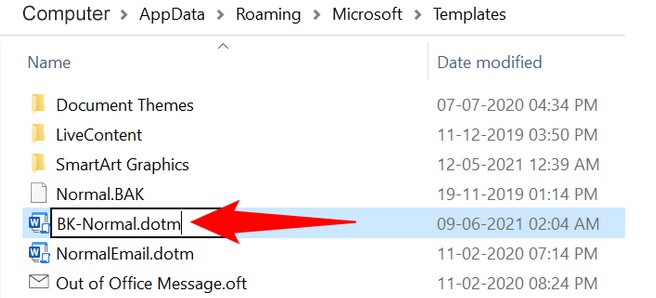
3. Select Rename from the context menu when you right-click the Normal.dotm file.
4. Enter BK-Normal.dotm as the new file name.
5. The app will create a new default document template when you launch Word.
Repair Microsoft Office on Your Computer
If the spell checker in Word still doesn’t function, there might be a problem with your Microsoft Office installation. In this scenario, use Office’s repair tool to fix any issues with your Office applications, including Word.
Because the repair tool is embedded within Office, you do not need to download or install anything on your computer.
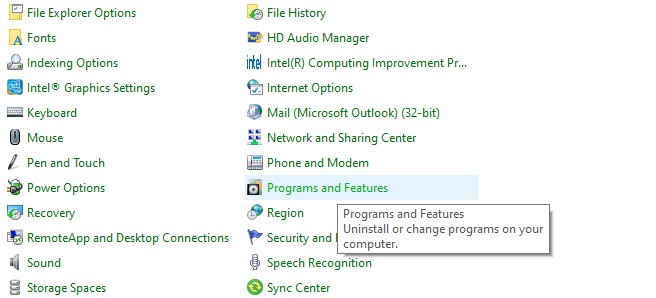
1. You may launch the Control Panel program on your computer by navigating to the Start menu, typing in Control Panel in the search bar, and choosing the application from the list of results.
2. In the Control Panel box, click Uninstall a program. (Don’t worry, you’re not removing anything.)
3. Select Microsoft Office from the list and then Change at the top.

4. In the User Account Control box, click Yes.
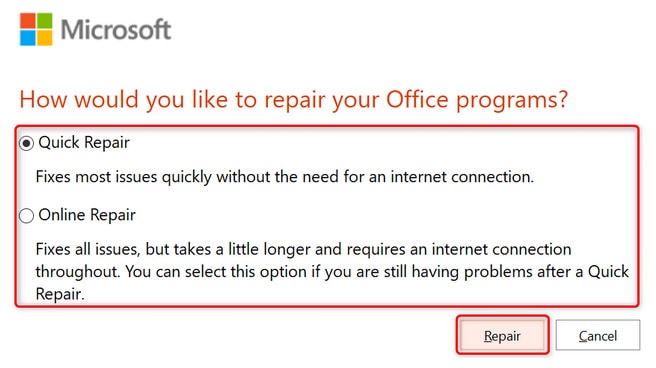
5. Enable the Quick Repair option and select the Repair button at the bottom. If Quick Repair does not fix your Office app issues, you may try Online Repair.
6. To address your Office app issues, follow the on-screen instructions.
Many Solutions to Spell Check Not Working in Word
If you depend significantly on Microsoft Word’s spell check feature to fix issues in your documents, not working might be a significant annoyance. Fortunately, as shown above, you have numerous options for resolving the issue and repairing the faulty spell checker. Nevertheless, we hope the information in this guide to fix Word spell checker issue is helpful to you. Also read article on what is Windows Clean Boot Process?