Is your Laptop camera not working or stuck on a black screen? Yes, this may be aggravating. In our technology-driven age, we rely on online interactions; in this circumstance, a malfunctioning camera might cause delayed work. A working webcam is essential for both professional and personal interactions. The laptop camera may be used for a variety of purposes. Still, most people use it to capture photographs, have video conversations on Skype or Google Hangouts, and so on.
If the integrated laptop camera is not working, you can try updating the drivers using the instructions below. In addition, if the built-in camera is not working, ensure that any webcam protection software is correctly configured. Check the camera’s privacy settings and continue reading our article to fix Laptop camera not working issues.
The laptop camera may not always open or function as planned. As a result, issues with Laptop camera not working on Teams or Zoom are apparent. Now, let’s continue with our tour guide. Read on for methods to help you fix your laptop camera when it simply won’t function.
How to fix laptop camera not working issue
1. Run the Hardware troubleshooter.
- Right-click the Start button and select Control Panel.
- Select View by in the upper right corner.
- Click the drop-down arrow and select Large icons.
- Select Troubleshooting and then click the View all option in the left pane.
- Select Hardware and Devices and then click Next.
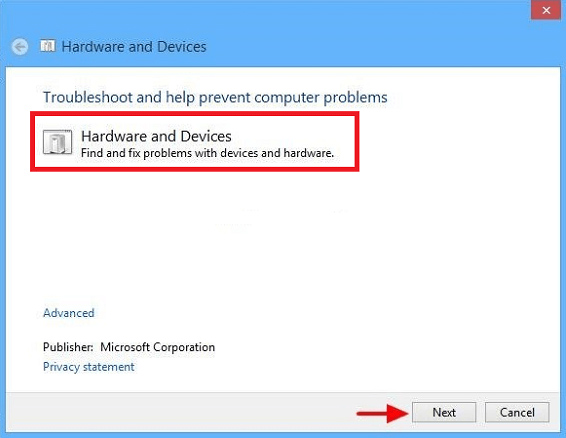
- Run the Hardware and Devices troubleshooter by following the on-screen directions.
- The troubleshooter will start looking for issues.
If you have issues with a recently installed device or hardware on your PC, run the Hardware and Devices troubleshooter to address the issue.
This checks for common issues and guarantees that any new device or hardware is correctly installed on your computer.
How can I fix my laptop’s webcam black screen issue?
- The first step is to start your computer into Safe Mode.
- Next, in Safe Mode, check to see if your laptop camera is working correctly. If so, go to the troubleshooting steps described below.
- If your webcam works well in Safe Mode, you may need to remove some programs from the start process.
- To do so, open the Task Manager on your laptop.
- Next, navigate to the Startup tab and find the programs and apps that consume a significant amount of your resources (This information is available in the Startup impact column).
- Finally, select the troublesome apps and press the Disable option.
If your camera only displays a black screen on Zoom, you should also check the video settings in that app.
If the issue is not resolved, we have more suggestions to assist you in fixing webcam black screen issues.
This article will also fix you in resolving the following camera issues:
- Error code 0xa00f4271 – This occurs when you attempt to use your webcam.
- Error code 0xa00f4244 – nocamerasareattached occurs when the Camera app cannot correctly detect your webcam.
- Error code 0xa00f4292 – Corrupted or missing drivers are the cause of this issue, but our guide will fix you in resolving it.
2. Update the latest Camera Driver for your laptop
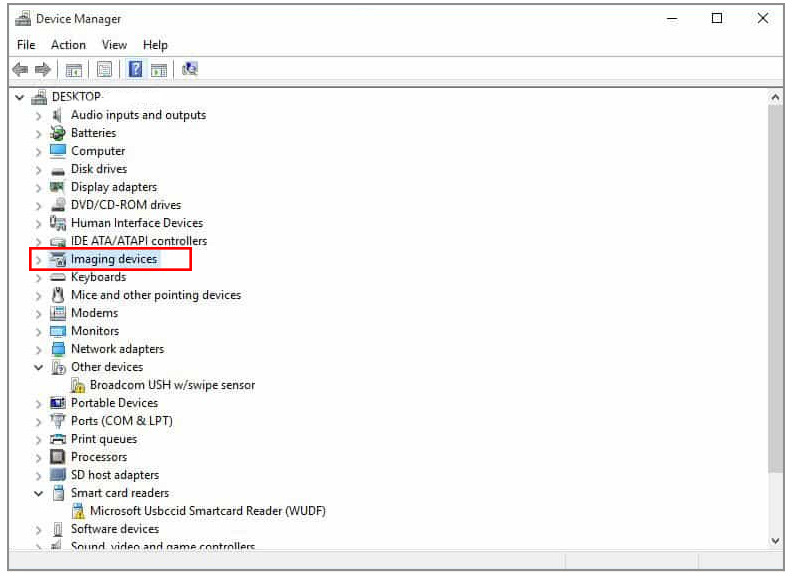
- Select Device Manager from the Start menu.
- Expand Imaging Devices by clicking on it.
- Right-click on the laptop camera or integrated webcam driver and select Properties.
- Select Driver Software Update.
When asked how you want to search for drivers, select Search automatically for updated driver software.
If a driver is available on your computer, pick Browse my computer for driver software, then select the right place for upgrading it (you must be online to do this).
- Choose to Allow me to select from a list of device drivers on my computer.
- Select a USB Video device.
- Click Next, then follow the on-screen instructions.
- Restart your computer.
Finding the right driver might be challenging. As a result, we recommend that you use an automated driver tool to search your PC for out-of-date or missing drivers and update them automatically.
Dedicated driver updaters, such as DriverFix, will match your hardware with its appropriate driver, removing any further issues that may arise from running an incorrect driver.
3. Reinstall the Laptop Camera
- Select Device Manager from the Start menu.
- Expand the list of imaging devices by clicking the arrow.
- Uninstall your laptop camera or integrated webcam by right-clicking on it.
- Restart your computer.
- Check it to install the driver automatically on PC start, then launch the laptop camera to see whether this addresses the issue.
Follow the steps above to reinstall the laptop camera driver, which is especially important for HP users.
4. Set up the Driver in Compatibility Mode.
- Go to the manufacturer’s website and download the most recent driver.
- Save it to your hard drive.
- Right-click on the driver installation file.
- Navigate to the Compatibility tab by clicking Properties.
- Click the Run this program in Compatibility mode checkbox.
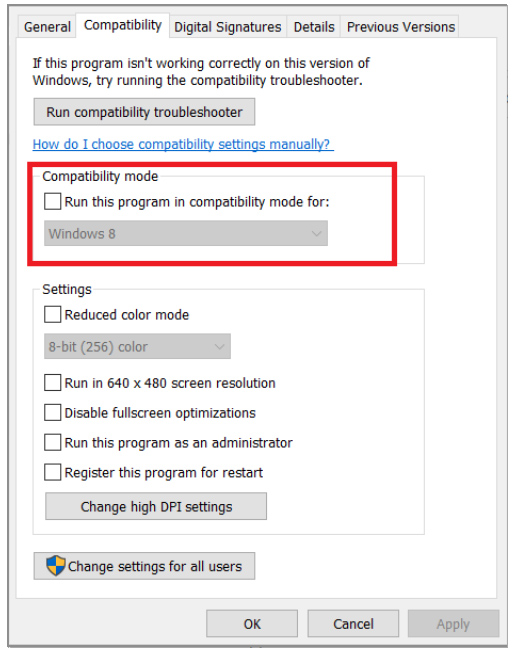
- Select the Operating System from the drop-down menu.
- The driver will be installed and then tested for functioning.
- Restart your computer to see if the problem remains.
5. Roll Back Driver
- Right-click the Start button and select Device Manager.
- Navigate to Imaging devices and expand the list by clicking the arrow.
- Right-click on your webcam and select Properties.
- Select Properties.
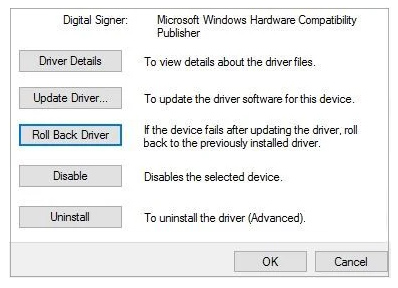
- Navigate to the Driver tab and select the Driver Details option.
- Use stream.sys to find a file name. If you have this on your computer, your webcam must be changed because it was created before Windows 7, If not, roll back your webcam by clicking on Roll Back Driver and following the steps below:
- Go to Device Manager.
- Navigate to Imaging devices and expand the list by clicking the arrow.
- Right-click your webcam and select Properties.
- Navigate to the Driver tab and select Roll Back Driver to fix Laptop camera not working issue.
- Select OK.
When the rollback is complete, restart your computer and try to open the webcam again. If the rollback is successful, you will need to disable incoming Windows 10 driver updates.
6. Check your Antivirus Software
If your laptop camera does not operate or open, or if you receive an error message stating that the laptop camera cannot be located or cannot start, it might be due to antivirus software blocking it or an outdated webcam driver.
Check your antivirus program for settings relating to limiting access or authorization to use your webcam in this scenario.
7. Check the Camera Privacy Settings.
- Select Settings from the Start menu.
- Enter the webcam in the search box.
- Choose Camera privacy settings.
- Verify that the Allow apps to use my camera option is turned on.
Is your laptop camera’s privacy settings enabled? To do so, follow the steps outlined above.
Make a new user profile.
- Select Settings from the Start menu.
- Select Accounts.
- Click Add another user to this PC.
- Enter the user name and password into the box. A new user account will be created for you.
- Select Change account type.
- Select Administrator from the drop-down arrow to elevate the account to the administrator level.
- Restart your computer.
- Log in to the newly created account.
You may also create a new user account and see whether your laptop camera works with the new profile, then change the settings to administrator rights and see if the problem with the laptop camera remains.
If the issue goes away, it might suggest that your other user profile is corrupted. If your user profile is corrupted, you might attempt the following:
- Use your new account to downgrade your current account.
- Select Apply or Ok.
- Return your previous account to its default administrator level.
- Rinse and repeat many times to help remove any corruption.
- Continue to use your account as an Administrator.
Check to see whether the laptop camera works with the newly created account. If so, you may fix the old user account or move to the new one. Most of the time, it may assist to address laptop camera not working issues.
You may also use an external webcam as an option. It is sometimes the best option, especially if you want higher-quality photographs and movies.
9. How to fix Webcam issues on particular laptop models
1. Lenovo laptop camera not working
1. Disable camera privacy mode
- Go to Lenovo Settings and click on the camera
- Locate Privacy Mode
- Disable the privacy mode and check if the camera is working now
2. Update the camera driver
- Open Device Manager
- Navigate to Imaging Devices
- Right-click on Lenovo EasyCamera
- Choose Update Driver to install the most recent driver updates.
3. Examine the malfunctioning program’s settings.
If the camera on your Lenovo laptop isn’t working in some programs, make sure the Lenovo EasyCamera is configured as the default camera in those programs.
2. The camera on my MSI laptop is not working
- Open the Settings and launch the Hardware and Devices troubleshooter (Update & Security > Troubleshooter).
- Reactivate your laptop camera:
- Press Fn-F6 to activate the webcam.
- Click on the TurboBattery + icon.
- Select the Windows icon from the toolbar.
- Re-enable the webcam on the laptop.
3. The camera on my HP laptop is not working
- Make sure your HP laptop webcam is set as the default camera in your software.
- Use the Device Manager to update the webcam driver.
- Remove any other webcam drivers and programs that may interfere with your HP webcam.
- Disable the webcam in Device Manager by going to Imaging devices, right-clicking on your HP webcam, and selecting Disable.
4. Dell laptop camera not working in Windows 10
- Check your webcam privacy settings and make specific Windows 10 has permission to use the webcam.
- Launch Windows 10’s Hardware & Devices troubleshooter.
- Use the Device Manager to install the most recent webcam driver updates.
5. Asus laptop camera not working
- Make sure your webcam is turned on.
- Install the most recent operating system and driver updates.
- Turn off any unwanted background processes.
Please let us know if any of these ideas managed to address the laptop camera issue in the comments area below. Please put any other questions there as well. Also read how to Fix the Camera Error in Windows 11.