You will find instructions in this post on fixing the Camera Error in Windows 11? A complete guide with step-wise instructions to fix this issue. There have been many complaints of users having an error with their camera and seeing a lock sign on the window of their camera app.
The following factors usually cause this issue:
- Insufficient permissions — Your camera application lacks the necessary permissions to launch and work on your device. These settings may be modified in Windows Settings.
- Generic corruption error — In certain situations, a temporary problem or glitch might infect your PC’s camera application, preventing it from running correctly. If this scenario applies to you, the simplest and most suitable approach to resolving the issue is using Microsoft’s built-in Camera Troubleshooter.
- Outdated or corrupt driver — For the application to run effectively, the drivers associated with each hardware component must be in good working order. If any key drivers are either obsolete or malfunctioning, you will likely run into problems described above. To proceed in this circumstance, you must reinstall the necessary driver.
- Overly defensive antivirus — Your computer’s antivirus program may recognize the activity as suspicious and block the camera. You might try disabling or uninstalling the security application in this case.
Now that we’ve identified the possible reasons let’s look at the solutions that have worked for other people in addressing the camera error.
Make Use of a Keyboard Shortcut
If you can’t access the camera, try using a keyboard shortcut to see if it solves the problem. Typically, any of the F keys are linked to a webcam. Unfortunately, we can’t say which key it is since it varies across devices.
Check whether you can launch the camera by holding the Fn button (function button) and the matching F Key together. If the error continues, go to the following procedure listed below.
Run the Camera Troubleshooter
Every Windows operating system has a collection of troubleshooters designed by Microsoft to fix difficulties like the one at hand.
You may also try running Windows’ built-in Camera troubleshooter to fix the Camera error in Windows 11.
The troubleshooter will check the system for any camera-related faults that may be the source of the problem.
Based on the findings, it will then recommend fixes.
To run the troubleshooter, follow these steps:
1. Open Windows Settings by pressing Win + I simultaneously.
2. Click the Troubleshoot button located on the right side of the window after selecting System from the left pane.
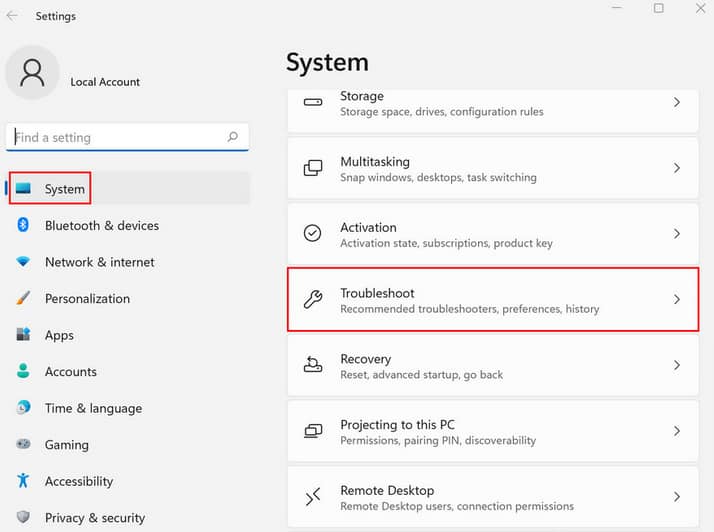
3. Select Other troubleshooters.

4. Locate the Camera in the next window and click on the Run button next.
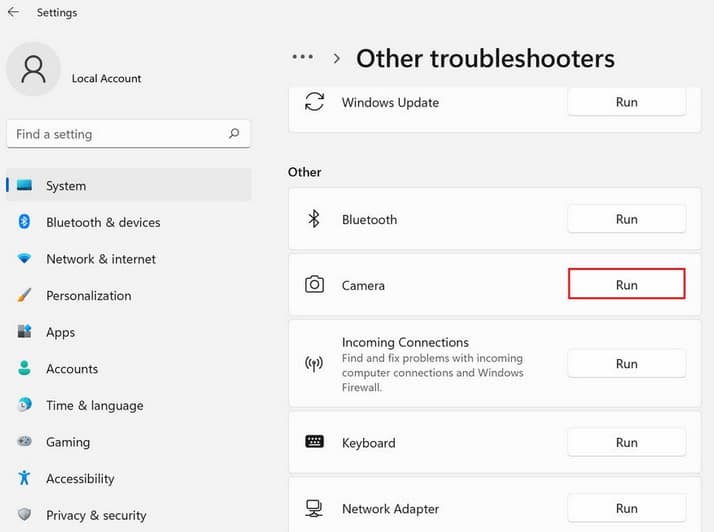
5. Wait for the troubleshooter to finish its work. If it finds problems and suggests changes, click on Apply this fix.
After applying the fix, see whether you still check the camera error while trying to use the application. In most of cases this method will fix the Camera Error in Windows 11.
Modify Privacy Preferences
Apps on your operating system need special permissions to run. If specific permissions are refused, they either fail to perform a few tasks or do not launch at all.
In the case of an error, the camera app may not have the necessary permissions, so you get a lock symbol when you try to launch it. If this is your case, you should be able to fix the problem by modifying the privacy settings on your device and allowing the app to have the permissions it needs to run correctly.
It is how you can accomplish it:
1. To launch Windows Settings, press the Win + I keys together.
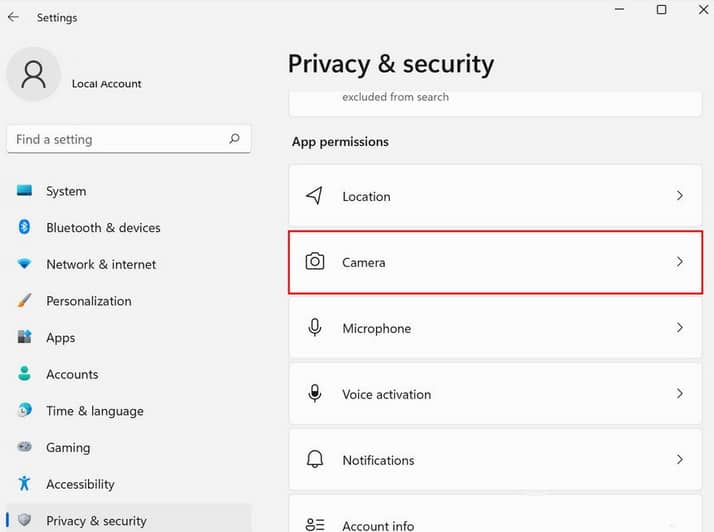
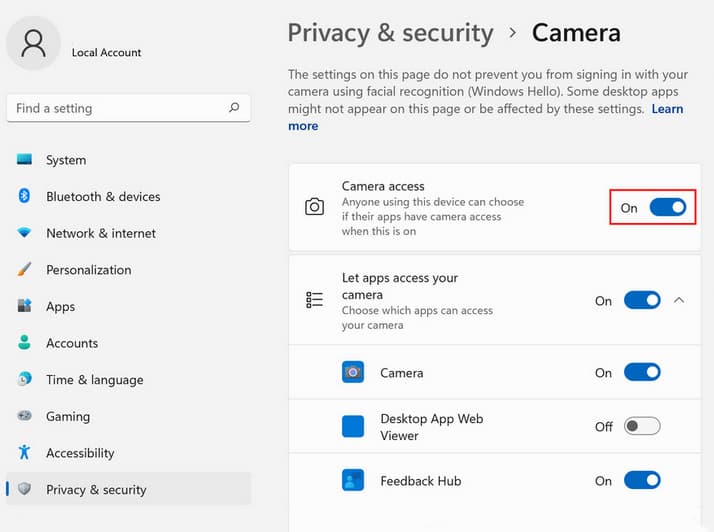
2. From the left pane of the Settings window, click Privacy & Security.
3. On the right-hand side of the window, click on Camera under App permissions.
4. If camera access is disabled, turn the Camera access toggle.
5. Next, check to see whether your preferred applications are permitted to access the camera in the same window.
6. Next, turn the Let Desktop apps access your camera toggle.
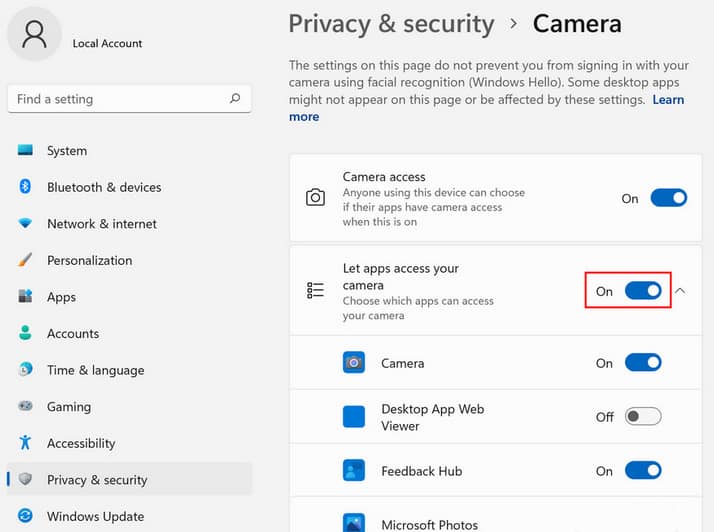
7. Close Windows Settings and recheck the camera app. It will fix the Camera Error in Windows 11.
Turn off Antivirus
If the camera already has the necessary permissions to work, your excessively defensive antivirus may be preventing the camera from starting and showing the camera error. Therefore, before carrying out the task at hand, you should first remove or deactivate any antivirus software that may be preinstalled on the Windows computer you will be using.
If the camera works without the antivirus, we suggest that you upgrade to a better antivirus application to fix the Camera error in Windows 11.
Reinstall the Webcam
Reinstalling the webcam via the Device Manager was another fix that worked for several impacted individuals. It is an excellent remedy if the error is caused by a corruption error or a flaw in the app.
To fix the issue, reinstall the camera as follows:
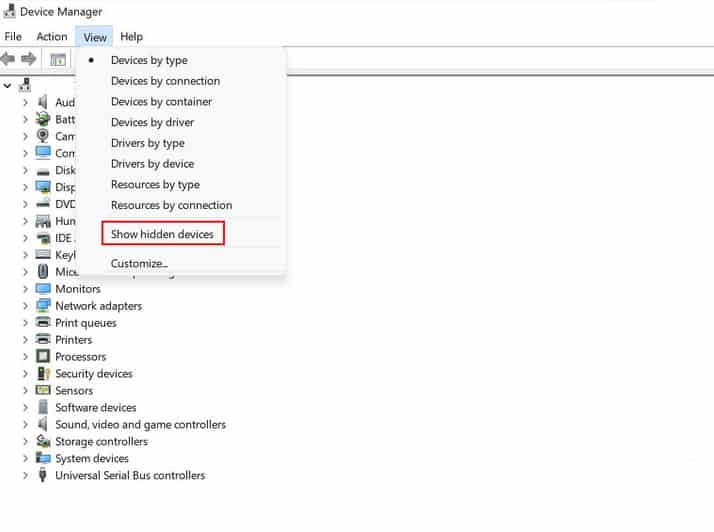
1. In the taskbar’s search field, type Device Manager and click Open.
2. From the Device Manager window, go to the View menu at the top and click Show hidden devices from the context menu.
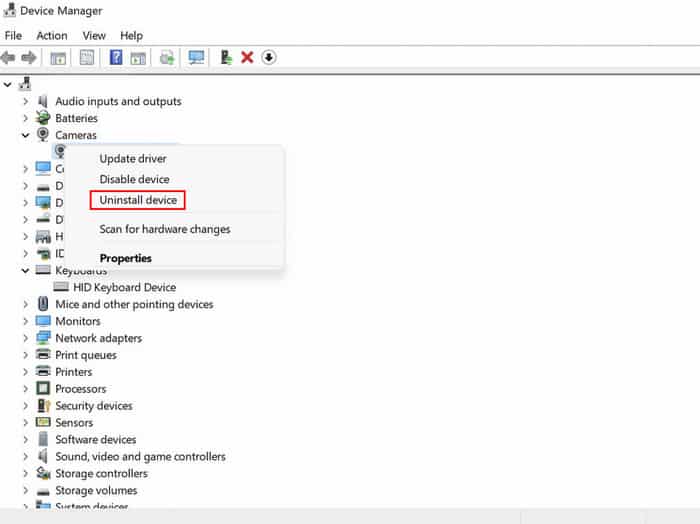
3. Select Imaging Devices or Other Devices and right-click on your camera.
4. From the context menu, choose Uninstall device.
5. In the next window, choose to Delete the driver program for this device.
6. To continue, click Uninstall once again.
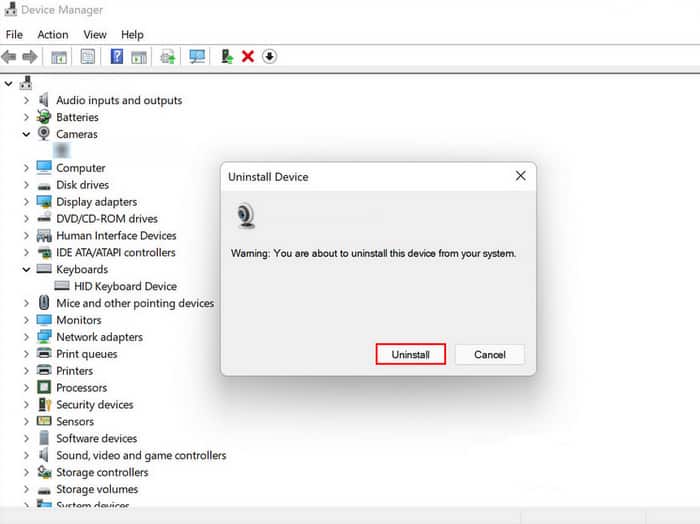
7. When finished, restart your computer. Upon reboot, the system will automatically install a new driver. Check to see whether this resolved the camera error.
Enable Lenovo Vantage Camera (If Applicable)
Some Lenovo customers overcame the camera error after activating the Camera from the Lenovo Vantage app.
If you own a Lenovo, we recommend going to the Vantage app and activating the camera application. It should work perfectly! So, this is article on how to to fix the Camera Error in Windows 11. Also, look how to Enable / Disable Touchscreen on Windows 11